Content
Monitor Blockchain Address/Contract in 60 Seconds
Looking to stay informed of your contract and wallet transaction activity? With Monitoring, understanding and responding to any activity is easy, minus the tech-heavy details. It’s a no-code solution that’s super easy to set up, monitor a blockchain address and takes just a minute of your time!
Directions below, with further documentation here.
We offer this service for free, as a public good, so you can detect any malicious activity and protect yourself, your business and your community. Sign up at Panorama.CUBE3.ai to get started, then and follow the steps below:
Step 1: Click “Add to Monitor”
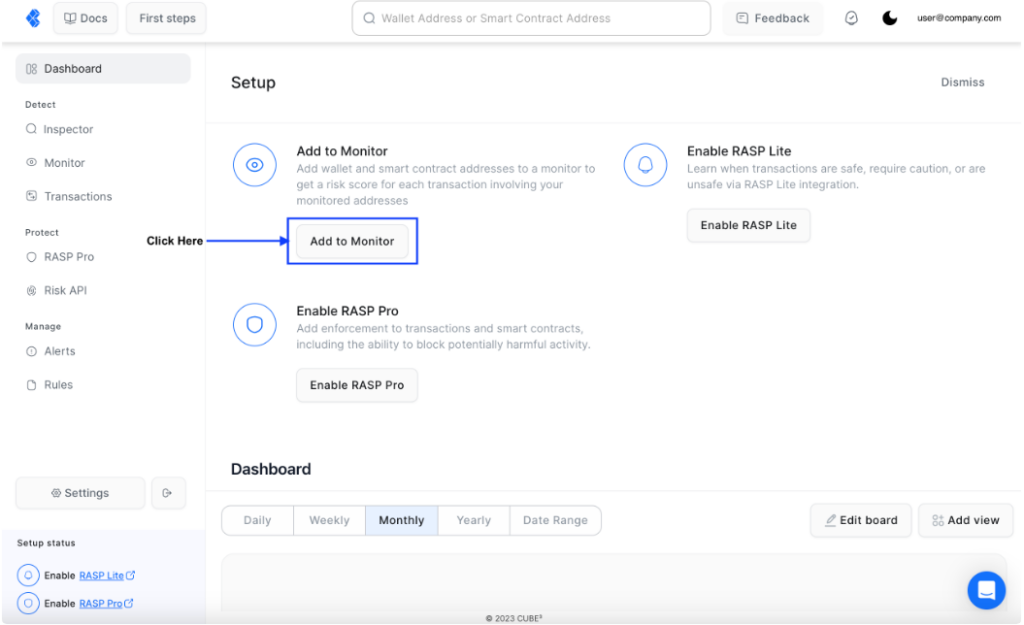
Step 2: Enter an address to monitor
- For your reference later, name what you are monitoring
- Specify which chain the address is on.
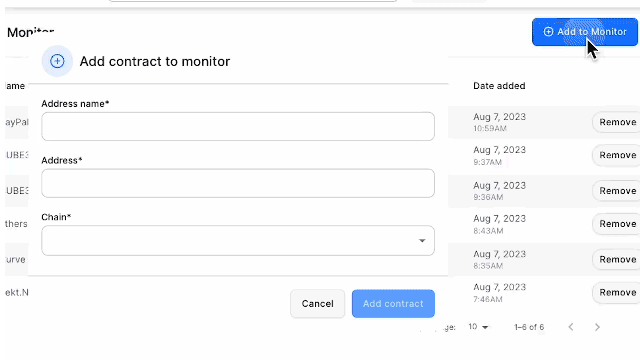
Your Monitor tab will display the name, address, and network you added.
Add up to three contract monitors on a CUBE3 Free account and monitor up to 1,000 transactions in a one month time period. Once you have reached the maximum of three monitors, you can either remove a monitored address, or contact sales and upgrade to a Pro account. Pro accounts do not have a restriction on the number of addresses you can monitor.
Step 3: View Monitored Transactions
- “Monitor” tab displays the addresses you’ve added manually.
- Note: An eye icon on the right-hand side of the table indicates Monitor transactions.
Click on each transaction to see details like Risk Score and categories score. On-Chain Transaction ID will take you to the block explorer for that transaction. You also get the CUBE3 Transaction ID, which can be used later in search.
That’s it! You’re all set!
You can monitor a blockchain address – congrats! However, if you want to get notifications via other platforms (Slack, Discord, etc.), continue to step 4…
Step 4: Set up Alerts
Receive immediate notifications about potential security threats and compliance risks. With Alerts, you can react swiftly to emerging concerns, ensuring that your web3 applications remain secure and compliant.
- Select Alerts from the left navigation bar in Dashboard
- You will be presented with two type of alerts – Monitor and RASP Lite or RASP Pro
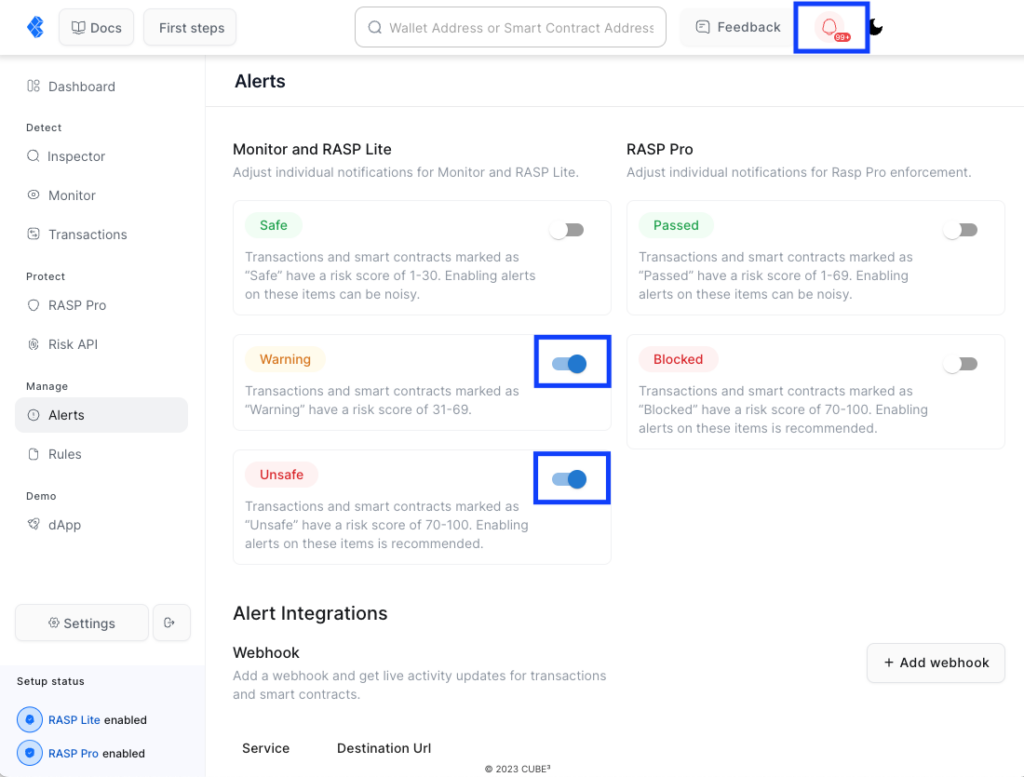
When setting up initial Monitor or RASP Lite, you can choose to receive alerts for Safe (1-30 Risk Score), Warning (31-69 Risk Score), and Unsafe (70-100 Risk Score). We recommend selecting only Warning or Unsafe transactions, as these will be the ones you would like to get alerts for when a transaction is not normal. Safe transactions can cause many alerts and in most cases are not needed for monitoring.
Once you have set up RASP Pro, you can set up alerts for RASP Pro transactions. We suggest only selecting Blocked transactions (70-100 Risk Score). If you select Passed transactions, you may get many alerts.
Step 5: Set up webhook alerts
Get alerts from your preferred applications in real-time.
We currently support the following integrations:
- Slack
- Discord
- Telegram (Coming Soon)
- Third Party (Coming Soon)
Now you’ll get notifications for any risky transactions within your thresholds.
If you have any questions or feedback, get in touch by joining our community on Telegram @CUBE3AICommunity or via the Feedback tab in your Panorama Dashboard.
✌️ Thanks for making web3 safer with us!
 Einaras Gravrock
 Attila Marosi-Bauer

 CUBE3.AI

 Sarunas Matulevicius


 Tamás Kelemen